

How To Add Grunge Effect Photoshop To Words
Add a Vintage Grunge Upshot in 5 Like shooting fish in a barrel Steps with Photoshop
Grunge textures are one of the most popular search terms in our Storyblocks library–and for good reason! Textures are an invaluable resource to graphic designers and photographers alike. Grunge textures, in item, can send a moving picture back in time, creating a dramatic, vintage outcome. That's why nosotros've created this elementary tutorial to evidence yous how to rapidly add grunge-styled textures using stock vectors and photos.
Whether it'southward for habitation decor or website illustrations, the grunge effect is one of the most versatile graphic design techniques. In this tutorial, we'll show you how to add a grunge texture to an image in five like shooting fish in a barrel steps. And if you lot're anxious to larn more than, you tin can also cheque out our tutorial on adding groundwork textures in Photoshop.
Step 1. Choose an Epitome
You'll want to pick an image that looks convincingly vintage when y'all add together the grunge effect. Y'all tin can download the epitome we used hither.
One time yous've selected your image, become ahead and open information technology in Photoshop.
Step 2. Add the Grunge Texture
Select a grunge texture. Elevate the grunge texture file onto your Photoshop workspace. Adjust the size of the texture as needed past dragging the corners of the epitome.
Join Our Creative Community
Access the best video tips, pattern hacks, and deals direct to your inbox.
Stride 3. Cull a Blending Mode
Select a blending mode from the drop-down menu under the "Layers" panel on the correct. You can experiment with blending modes until you observe one that fits your project. We selected "Hard Low-cal" for this tutorial.
Footstep 4. Add together a Black & White Adjustment Layer
Under the "Adjustments" console, click the "Black and White" icon. You tin likewise go to the menu bar and select Image > Adjustments > Black & White.
Step 5. Suit the Opacity on the Grunge Texture Layer
Select your grunge texture layer, click "Opacity," and adjust the slider until you accomplish the desired effect.
Pro-tip: Remove Unwanted Marks from the Image
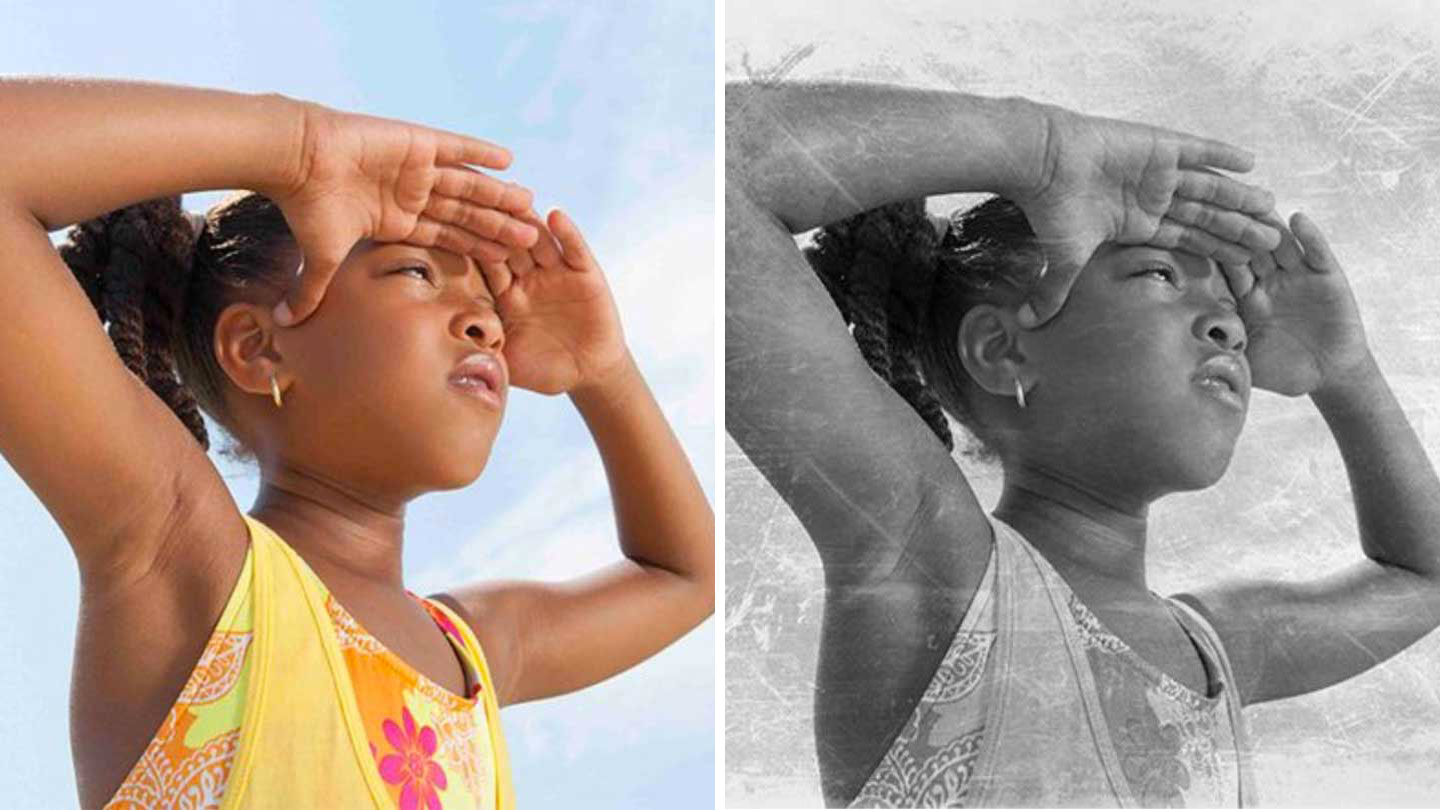
If yous find that the texture is simply a footling as well grungy, you can always make more adjustments to the image. For our picture, nosotros wanted to get rid of a few of the marks that were obscuring the girl's face.
Select the texture layer, and so become the menu bar and select Layer > Rasterize > Smart Object.
Once you lot have rasterized the texture layer, click on the "Healing Brush" icon on the left (it looks like a Rough-and-tumble).
Before you can fix the prototype, you need to select a "source point." The source point is a location on the image that you desire to use to repair a damaged surface area. To select a source point, merely Pick+Click on a clean surface area well-nigh the damaged surface area. We selected a part of the girl'due south cheek without any grunge marks as our source indicate.
Once you have selected your source point, just click and drag your mouse over the surface area that you lot want to repair. You can experiment with the length of your strokes to encounter what technique works best for your image.
Voila, your image is consummate!
Now go forth and create false-vintage photos!
Check out our royalty-gratuitous stock photos to detect some inspiration. You lot tin can download all of these photos, textures, and more as part of your Storyblocks subscription. Once your project is consummate, share it with us in the comments, or upload information technology to Instagram and tag @storyblocksco.
- Tags:
- Adobe Photoshop,
- images,
![]()
Source: https://blog.storyblocks.com/tutorials/tutorial-stock-photos-vintage-grunge-effect-5-easy-steps-photoshop/
Posted by: kerrdegras.blogspot.com
0 Response to "How To Add Grunge Effect Photoshop To Words"
Post a Comment